Recently I had a coworker come to me and ask would it be possible to create a wireless mute button for a telepresence device. Now I had to think about this one and kind of wonder what are the reasons why you would want a wireless mute button and I guess the scenario that my coworker had come up with was “What if you’re presenting from the back of the room and you want to be in charge of the presentation and mute and unmute but don’t want to have to move to mute”. So, I sat down and figured out how to do this and turns out I had all the things to make it happen right in my office.
To complete this project, we will need
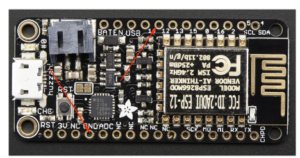
1x Adafruit Feather HUZZAH with ESP8266 https://www.adafruit.com/product/3046
1x battery https://www.adafruit.com/product/353
1x arcade button https://smile.amazon.com/gp/product/B07D9CR5Z9
1x Enclosure. I used a cardboard box but feel free to improve on the design.
Optionally:
1x Panel Mount USB Cable https://www.adafruit.com/product/3258
You will also need a Cisco CE endpoint running > CE 9.6 or any Cloud registered Webex Device. For this build I was using a Cloud registered Webex Desk Pro https://www.cisco.com/c/en/us/products/collaboration-endpoints/webex-desk-pro/
To start we must first load Micropython onto the ESP8266. I won’t cover the process in depth here but it’s fairly straight forward. https://docs.micropython.org/en/latest/esp8266/tutorial/intro.html is a great guide and basically covers exactly the process I followed.
Next Lets set up the endpoint to receive the requests. For simplicity’s sake we are going to use HTTP to send the requests since the ESP8266 might not handle later versions of TLS.
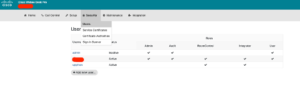
First we need to create a user to send the commands to the device. This can be done by accessing the device UI either via its IP address or the Cisco Webex Control Hub.
Either way once you are in go to Security > Users > Add New User. I gave my user “upython” RoomControl and Integrator Roles. In reality the Integrator or room control role both have similar permissions and can access the API we want.
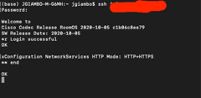
Finally, you need to SSH into the device and enable the HTTP API. If you are using a cloud registered device, you will also need to create a user account that has access to the admin role.
Use the command “xConfiguration NetworkServices HTTP Mode: HTTP+HTTPS”
Once we have Micropython loaded and the endpoint configured we need to get some code going. For Simplicity I have included both a main.py and a config.py file on my github. https://github.com/jgiambo/BlogProjects/tree/master/WirelessCEMuteButton
You will need to update config.py to your settings as well as the Basic Authorization header which is just the base64 encoded un:password that you configured on the endpoint. For example, if you used username upython and pw micropython the header would be Basic dXB5dGhvbjptaWNyb3B5dGhvbg==
I will use this password throughout the rest of this guide, but rest assured it has been changed on my actual device.
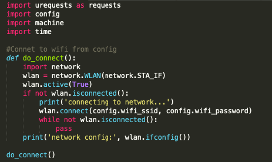
First connect to the Wifi
Set the endpoint URL, the Auth headers and the XML Body to send.
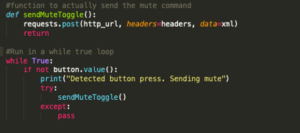
The CE Endpoint nicely offers us a toggle mute function so I don’t even need to check the status of the mute state. Just toggle it.

Then create a function to call the HTTP API on the endpoint and stick it into a while true loop waiting for a button press.
Now let’s wire up the Device. Attach one wire to pin 12 like we set up and one wire to ground. Attach with button in the middle

Test it out and see if it works. In this picture I was using a small test button, but you can jump straight to using the arcade button.
Ok that’s great! Let’s throw the arcade button on top of a box and drop all the electronics into it. Solder the wires or use push connectors. Optionally add a hole for a USB charger and use the panel mount USB.
And we are done!
Hopefully you found this informative. Check back next time for more simple projects!